

Which is better for making soap: cold process vs hot process?
So you want to make homemade soap? That’s great! But which method should you choose?
In this article, we’ll explore cold process soap and hot process soap making: what makes them the same, what makes them different and how to you can do each one at home. Of course these aren't the only two methods to choose from. You may have heard of melt and pour or re-batch as well! Both of these have a "pre made" element to them.

Today we're focusing on hot process and cold process soaps because they are the two methods done "from scratch". Read all the way to the end to find out which method we think is better!
A summary of the 2 types of making soaps
Let’s take a quick look at the 2 ways of making soap. Don’t worry if it doesn’t paint a clear picture just yet, we’ll go into more detail a little later on!
Cold process method
Cold process soap-making is not truly cold, it’s room temperature! It involves mixing together oils and lye to create a saponification process that has a long curing time.
Time out!
Lye? Saponification? Curing time?
Before we go any further, let's pause to break down these soap-making terms.
- Lye is a strong alkaline liquid (or powder) made from leaching wood ashes. More simply, its a chemical that turns oil into soap! Sometimes its called sodium hydroxide lye. It's corrosive, meaning it can burn through your skin - and must be handled carefully. When making soap at home with lye, you must always wear safety goggles, an apron and gloves. You'll want to be in a well ventilated room when handling lye.
- Saponification is the chemical reaction that occurs when a lye solution (lye + water) and oil are combined. It's what turns the oils into soap!
- Curing is the final step of soap-making, when the soap becomes preserved through drying
OK now that we’ve sorted that out, back to the methods. Time to heat things up, literally.
Hot process method
Whereas cold process soap-making is done at room temperature, the hot process method uses heat to speed up the saponification process. It involves a very similar mixing together of ingredients but there are some differences.
What are the key differences
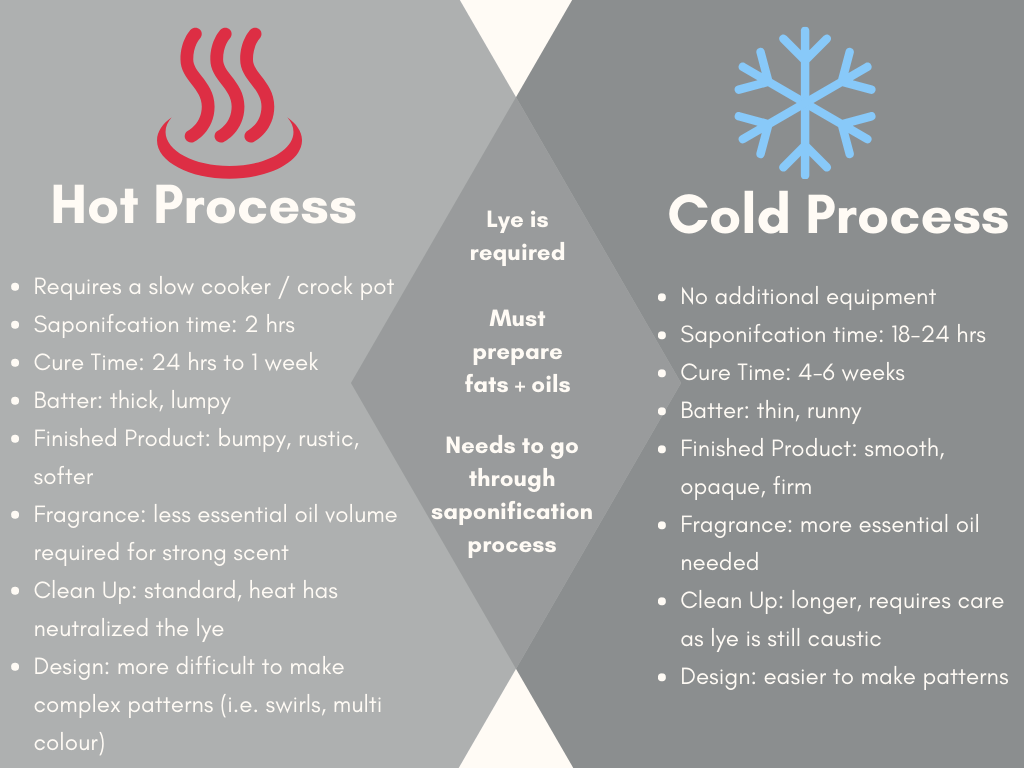
There are many differences between hot and cold process soapmaking. The key differences making are:
- Time - hot process soap has shorter saponification and cure time than cold process soap.
- Texture - hot process soap batter has a thick texture. This thick texture makes for a less smooth texture of the final product. Hot process soaps tend to have a rustic appearance whereas cold process soap batter is thinner and so cold process soaps are smoother.
- Customization - it is easier to make patters/designs with the cold process method.
And here's a quick glance at some of the other differences between the two methods.
What are the key similarities
Both use lye.
Other methods, like melt and pour soap, do not use lye. But whether you choose hot or cold process for your handcrafted soap, you will need to get your safety gear ready.
Both require fats & oils to be prepared.
Before you combine with any other ingredients, all the oils in your soap must be mixed together. If you're using any fats like shea butter for exmaple, it must be melted down and then stirred in with the other oils.
Both need you to saponify the lye + oils together.
Saponification is what makes handmade soap, soap! So no matter which method you choose, saponification is required.
The Process for Each
OK here we go, the main event! Find below a comprehensive step-by-step guide to cold and hot process soap-making.
Cold process
- Create your lye solution. To do this, measure the filtered water (room tempurature, approximately 68 degrees F) and lye into two separate containers. Always work in a well ventilated area. Slowly pour the lye into the water. The mixture will warm up and steam. Allow it to cool. Use caution! NEVER pour water into lye this is dangerous and will cause the lye to volcano up out of the container.
- Combine oils and butters. Use the "double boiler method" by simmering a few inches of water in one pot with oils and butter sitting on top in a second pot or heat-safe bowl. When everything has melted, stir to combine. Then, remove the mixture from heat and let sit until cooled down to room temperature.
- Slowly pour the lye into the oil mixture. Use an immersion blender to mix until the tracing point. You'll know to stop when the mixture has emulsified which means its completely combined with no visible trace of either separate substance. It will be milky/cloudy with a pudding-like consistency.
- Add essential oils and mix in additives (oatmeal, fresh ingredients like milk, etc.).
- Pour into a mold and wrap to insulate for 1-2 days.
- Pop soap out of mold and cut if necessary.
- Cure bars in a dark and cool room for 4-6 weeks, turning occasionally.
Hot process
- Measure all the oils (both solid and liquid, but keep them separate for now), lye, water, fragrance and colorants. Prepare your mold.
- Melt the oils. Set your slow cooker/ crock pot to low and add the solid oils (coconut oil, shea butter) first. While they melt, complete step 3.
- Create the lye solution. Slowly pour the lye into the water. The mixture will warm up and steam. Stir the water slowly until the lye is dissolved. Use caution! NEVER pour water into lye this is dangerous and will cause the lye to volcano up out of the container. Allow the solution to cool about 15-20 minutes.
- Add liquid oils (olive oil, to the solid oils/fats that are now melted in your slow cooker. You want all oils to be melted all the way before moving on to the next step.
- Use thermometer to check the temperature of the oil mixture. Once it reaches 120-130 degrees F, add your lye. Again, pour carefully and use protective gear because lye is corrosive. You want to avoid splashing! Pro Tip: Place your immersion/stick blender into the slow cooker at an angle. Slowly pour the lye down the metal shaft of the blender to help it flow gently into the oils without splashing.
- Stir the mixture with your blender for a few moments. Then, begin to pulse the blender on low, moving it around the pot. Keep the blender head fully submerged in the mixture to avoid splashing and to minimize air bubbles.
- Continue to mix for 10-15 minutes, alternating between manually stirring and slowly pulsing the blender on low until emulsified. This means the batter is fully combined; you cannot see the separate parts. You've reached "trace" when you pull the blender out and can see the mixture laying on the top. The trails in the soap indicate that trace has been reached.
- Cook! With lid on, cook your soap on low for 50 minutes. Pro Tip: Stay close by in case your soap wants to bubble up over the top. Simply remove the lid for a moment to stir.
- Allow soap to cool briefly, then gently stir in any additives (fragrance oils, colourants). Don't wait too long or else your soap will start to set (harden) and you'll have missed your chance.
- Fill up your soap mold! Work quickly so that your soap doesn't harden before you're finished. Tap the full molds on the counter to get out any air bubbles. If you're getting fancy with glitter and shimmery micas, add them now while the batter is still warm.
- Cure in a dark and cool room for at least 24 hours. The longer the cure time, the harder the soap! Ideally, let your soap cure for about a week.
Which is better
So now that we've covered hot and cold soap making methods, it's time to write their report cards. Which one will come out on top?
Cold process soap pros:
- creamier bar
- smoother appearance
- larger batches (great for someone looking to start a little soap business!)
- colours are defined
- heat doesn't interfere with additives (essentials oils, dairy, etc.). '
Hot process soap pros:
- shorter cure time means instant gratification
- control super fats - you can wait until your batter is almost set before adding an oi/fat that you want for its moisturizing properties (ie shea butter) so that it does not saponify and become soap
- easier clean up
Ultimately, it's up to you to choose the way you want to make your own soap. It's mostly personal preference! And many seasoned soap makers use both depending on the goal of their project.
But if forced to choose, our winner is...
Cold process soap! It's the winner because without the external heat source, ingredients retain more of their "virgin" characteristics. This makes your soap bar more nourishing for your skin. Since cold process soap takes longer to cure, it's not the obvious choice for everyone.
Our cold process soaps
We love cold process soaps so much, we decided to make our own! Empyri hemp body soaps are formulated with hemp seed oil and hemp seed extract. Together, these ingredients nourish and hydrate your skin to keep it soft and supple.

Two of our bar soaps are made with a custom essential oil blend. The third bar soap is unscented for our friends with sensitive skin.
Also if you are concerned that you can legally take our hemp soap to another country, then check out our blog post on where hemp is legal in the world.